Small Beam Diameter Scanning Galvo Mirror Systems

- For Small (<5 mm) Beam Diameters
- Single- and Dual-Axis Options with Choice of Mirror Coating
- Mounting Adapters for Easy Integration into Standard Thorlabs Optomechanics
GVS002
Dual-Axis Motor/Mirror Assembly with Silver Mirrors
GVS001
Galvo Scanning System
Mounting Adapters are Available that Allow Our Single- and Dual-Axis Galvo Mirror Systems to be Integrated with Thorlabs' Standard Optomechanics

Please Wait
| Key Specificationsa | ||||
|---|---|---|---|---|
| Max Beam Diameter | 5 mm | |||
| 2-Axis System Beam Offset | 10 mm | |||
| Wavelength Range (Ravg > 95%) |
GVS00x (Silver): 500 nm - 2.0 µm GVS10x (Gold): 800 nm - 20.0 µm GVS20x (-E02): 400 nm - 750 nm |
|||
| Repeatability | 15 μrad | |||
| Damage Threshold GVS00x (Silver) GVS10x (Gold) GVS20x (-E02) |
3 J/cm2 at 1064 nm, 10 ns pulse 2 J/cm2 at 1064 nm, 10 ns pulse 0.25 J/cm2 at 532 nm, 10 ns pulse |
|||
| Linearity | 99.9% | |||
| Max Scan Angleb (Mechanical Angle) |
±12.5° (w/ 0.8 V/deg scaling) |
|||
| Resolution (Mechanical) | With GPS011-xx Linear PSU: 0.0008° (15 µrad) With Standard Switch Mode PSU: 0.004° (70 µrad) |
|||
| Full Scale Bandwidth | DC to 100 Hz Square wave, DC to 250 Hz Sine wave, DC to 175 Hz Triangular Wave, DC to 175 Hz Sawtooth |
|||
| Small Angle (±0.2°) Bandwidth | DC to 1 kHz | |||
| Small Angle Step Responsec | 300 µs | |||
| Optical Position Sensor Output | 40 to 80 µA | |||
| Power Supply Requirements | ±15 to ±18 VDC | |||
Demo Units Available
Interested in trying a Small Beam Diameter Galvanometer System for your application? Contact us at techsales@thorlabs.com to request a demo unit.Features
- Single- and Dual-Axis Systems
- Moving Magnet Motor Design for Faster Response
- High-Precision Optical Mirror Position Detection
- Analog PD Control Electronics with Current Damping and Error Limiter
- Choice of Mirror Coatings:
- Protected Silver: 500 nm to 2.0 µm
- Protected Gold: 800 nm to 20.0 µm
- Broadband Dielectric: 400 nm to 750 nm
- Kits with Power Supply, Cables, and Driver Card Cover Available
- Mounting Adapters for Post and 30 mm Cage System Compatibility
- Tip and Tilt Platform Adapter Facilitates Attachment to Thorlabs' PY003
These high-speed Scanning Galvanometer Mirror Positioning Systems are designed for integration into OEM or custom laser beam steering applications that utilize laser beams smaller than 5 mm in diameter. Each system includes a single- or dual-axis galvo motor and mirror assembly, associated driver card(s), and driver card heatsink(s). A low noise, linear power supply unit (Item # prefix GPS011) and motor/mirror assembly heatsink (GHS003) are available separately. Upon initial setup of the system, a function generator or DAQ card will be needed for operating the servo drivers; see Chapters 3 and 4 in the manual for additional information.
Each galvo system includes a motor drive cable, which connects the driver board to the motor. This 1 m long cable is specially calibrated to both the driver board and the motor's internal sensor. We do not recommend installing and calibrating your own cable; please contact Tech Sales if your application requires a custom galvo system.
A range of mounting adapters is available to ease the integration of the single- and dual-axis galvo systems into optical systems. These include a 30 mm cage mount for a single-axis galvo mirror, a post and cage compatible mount for a dual-axis galvo mirror system, and adapter for the PY003 tip and tilt platform that is compatible with both single- and dual-axis galvo systems. An optional enclosure for the galvo driver card is also available.
Galvo Motor/Mirror Assembly
The galvo consists of a galvanometer-based scanning motor with an optical mirror mounted on the shaft and a detector that provides positional feedback to the control board. The moving magnet design for the GVS series of galvanometer motors was chosen over a stationary magnet and rotating coil design in order to provide the fastest response times and the highest system resonant frequency. The position of the mirror is encoded using an optical sensing system located inside of the motor housing.
Due to the large angular acceleration of the rotation shaft, the size, shape and inertia of the mirrors become significant factors in the design of high performance galvo systems. Furthermore, the mirror must remain rigid (flat) even when subjected to large accelerations. All these factors have been precisely balanced in our galvo systems in order to match the characteristics of the galvo motor and maximize performance of the system.
The mirrors are available from stock with silver, gold, or broadband coatings.
Scanning Galvo Mirror Assembly and Driver Board
All Thorlabs scanning galvo mirror systems feature a mounted single or dual axis mirror/motor assembly and driver card(s). Shown to the right is the GVS001 1D galvo mirror and driver card with heatsink. The mirror assembly feature multiple mounting holes and a rotatable collar mount for the mirror/motor. These small 5 mm galvo mirrors feature a plug style connector to the mirror assembly. Please see below for additional mounting options and accessories.
Servo Driver Board (All Systems)
The Proportional Derivative (PD) servo driver circuit interprets the signals from the optical position detecting system inside the motor and then produces the drive voltage required to rotate the mirror to the desired position. The scanner uses a non-integrating, Class 0 servo that is ideal for use in applications that require vector positioning (e.g., laser marking), raster positioning (printing or scanning laser microscopy), and some step-and-hold applications. Furthermore, the proportional derivative controller gives excellent dynamic performance. The circuit includes an additional current term to ensure stability at high accelerations. The same driver board is used in all our galvo systems.
System Operation
The servo driver must be connected to a DC power supply, the galvo motor, and an input voltage source (the monitoring connection is optional). For continuous scanning applications, a function generator with a square or sine wave output is sufficient for scanning the galvo mirror over its entire range. For more complex scanning patterns, a programmable voltage source such as a DAQ card can be used. Please note that these systems do not include a function generator or a DAQ card. The ratio between the input voltage and mirror position is switchable, either 0.5, 0.8 or 1. When set to 0.8, the ±10 V input will rotate the mirror over its full range of ±12.5°. The control circuit also provides monitoring outputs that allow the user to track the position of the mirror. In addition, voltages proportional to the drive current being supplied to the motor and the difference between the command position and the actual position of the mirror are supplied by the control circuit.
Closed-Loop Mirror Positioning
The angular orientation (position) of the mirror is optically encoded using an array of photocells and a light source, both of which are integrated into the interior of the galvanometer housing. Each mirror orientation corresponds to a unique ratio of signals from the photodiodes, which allows for the closed-loop operation of the galvo mirror system.
The systems can be driven to scan their full mechanical range of ±12.5° at a frequency of 100 Hz when using a square wave control input voltage or at 250 Hz when using a sine wave. For a single small-angle step of 0.2°, it takes the mirror 300 μs to come to rest at the command position. The scan frequency range is DC to 1 kHz and the angular resolution is 0.0008° (15 μrad).
Galvanometer System Specifications
| Item # | GVS001 and GVS002 | GVS101 and GVS102 | GVS201 and GVS202 | |
|---|---|---|---|---|
| Mirror | ||||
| Maximum Beam Diameter | 5 mm | |||
| 2-Axis System Beam Offset | 10 mm | |||
| Material | Quartz | |||
| Coating | Protected Silver | Protected Gold | Broadband Dielectric (-E02) | |
| Wavelength Range | 500 nm to 2.0 µm | 800 nm to 20.0 µm | 400 nm to 750 nm | |
| Damage Thresholda | 3.0 J/cm2 | 2.0 J/cm2 | 0.25 J/cm2 | |
| Parallelism | <3 arcmin | |||
| Surface Quality | 40-20 Scratch-Dig | |||
| Front Surface Flatness (@633 nm) | λ | |||
| Clear Aperture | >90% of Dimension | |||
| Motor and Position Sensor | ||||
| Linearity | 99.9% | |||
| Scale Drift | 40 ppm/°C (Max) | |||
| Zero Drift | 10 μrad/°C (Max) | |||
| Repeatability | 15 μrad | |||
| Resolution (Mechanical) | With GPS011-xx Linear PSU: 0.0008° (15 µrad) With Standard Switch Mode PSU: 0.004° (70 µrad) |
|||
| Average Current | 1 A | |||
| Peak Current | 5 A | |||
| Maximum Scan Angleb (Mechanical Angle) |
±12.5° (Input Scale Factor 0.8 V per degree) | |||
| Motor Weight (With Cables, Without Brackets) |
50 g | |||
| Operating Temperature Range | 0 to 40 °C | |||
| Optical Position Sensor Output Range | 40 to 80 µA | |||
| Drive Electronics | ||||
| Full Scale Bandwidth | DC to 100 Hz Square Wave, DC to 250 Hz Sine Wave, DC to 175 Hz Triangular Wave, DC to 175 Hz Sawtooth |
|||
| Small Angle (±0.2°) Bandwidth | DC to 1 kHz | |||
| Small Angle Step Responsec | 300 µs | |||
| Power Supply | ±15 to ±18 VDC (1.25 A rms, 5 A peak Max) |
|||
| Analog Signal Input Resistance | 20 kΩ ± 1% (Differential Input) | |||
| Position Signal Output Resistance | 1 kΩ ± 1% | |||
| Analog Position Signal Input Range | ±10 V | |||
| Mechanical Position Signal Input Scale Factor | Switchable: 1.0 V, 0.8 V or 0.5 V per degree | |||
| Mechanical Position Signal Output Scale Factor | 0.5 V per degree | |||
| Operating Temperature Range | 0 to 40 °C | |||
| Servo Board Size (W x D x H) | 85 mm x 74 mm x 44 mm (3.35" x 2.9" x 1.73") | |||
Maximum Recommended Mechanical Scan Angles
| Item # | GVS001, GVS101 and GVS201 | GVS002, GVS102 and GVS202 | |
|---|---|---|---|
| Input Beam Diameter | X or Y Axis | X Axis | Y Axis |
| 5 mm | +10° / -12.5° | ±8° | +12.5° / -3° |
| 4 mm | ±12.5° | ±8.5° | ±12.5° |
| 3 mm | ±12.5° | +9.5° / -10° | ±12.5° |
| 2 mm | ±12.5° | +10° / -11.5° | ±12.5° |
| 1 mm | ±12.5° | +11° / -12.5° | ±12.5° |
Power Supply Specifications
| Item # | GPS011-US | GPS011-EC | GPS011-JP |
|---|---|---|---|
| Input Voltage | 115 VAC, 60 Hz | 230 VAC, 50 Hz | 100 VAC, 50/60 Hz |
| Output Voltage | ±15 VDC, 3.0 A / 0.1 A, 1.4/6.3 ms | ||
| Fuses | T2.0 A Anti-Surge Ceramic | T1.0 A Anti-Surge Ceramic | T2.5 A Anti-Surge Ceramic |
| Dimensions | 179 mm x 274 mm (Max) x 122 mm (7.05" x 10.79" (Max) x 4.8") |
||
| Weight | 4.73 kg (10.4 lbs) | ||
When configuring and operating the galvo scanning system, use only the cables supplied. Do not extend the cables.The driver boards and motors are calibrated with these cables. Using different cables will affect the performance of the system. Custom longer cables are available, but the units will require re-calibration if these are not specified at time of order. Contact Tech Support for more details.
GVS Series Driver Connections

Click to Enlarge
Overview of PCB Connectors. Details on each connector can be found below.
J10 Power Connector

| Pin | Designation |
|---|---|
| 1 | + 15 V |
| 2 | Ground |
| 3 | - 15 V |
J6 Diagnostics Connector
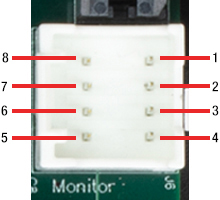
| Pin | Designation |
|---|---|
| 1 | Scanner Position |
| 2 | Internal Command Signal |
| 3 | Positioning Error x 5 |
| 4 | Motor Drive Current |
| 5 | Not Connected |
| 6 | Test Input (NC) |
| 7 | Motor + Coil Voltage / 2 |
| 8 | Ground |
J9 Motor Connector
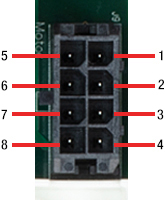
| Pin | Designation |
|---|---|
| 1 | Position Sensor A Current |
| 2 | Position Sensor Ground |
| 3 | Position Sensor Cable Shield |
| 4 | Drive Cable Shield |
| 5 | Position Sensor B Current |
| 6 | Position Sensor Power |
| 7 | Motor + Coil |
| 8 | Motor - Coil |
Galvo Assembly Motor Connector
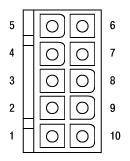
| Pin | Designation |
|---|---|
| 1 | Motor + Coil (Power Shield Floating) |
| 2 | Motor - Coil (Power Shield Floating) |
| 3 | Not Used |
| 4 | Not Used |
| 5 | Position Sensor B Current |
| 6 | Position Sensor Ground |
| 7 | Position Sensor A Current |
| 8 | Position Sensor Power (Automated Gain Control) |
| 9 | Position Sensor Cable Shield |
| 10 | Not Used |
J7 Command Input Connector


| Pin | Designation |
|---|---|
| 1 | Command Input +ve |
| 2 | Command Input -ve |
| 3 | DRV OK |
| 4 | External Enable |
| 5 | -12 V Output (Low Impedance O/P) |
| 6 | +12 V Output (Low Impedance O/P) |
| 7 | Ground |
| 8 | Ground |
JP7 Volts/Degree Scaling Factor Control
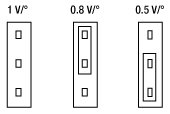
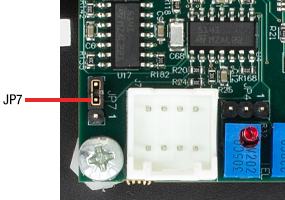
with the scaling set to 1.0 V/°, where the max scan angle is 10°, and is compatible with driver cards manufactured before October 2009.
To set the maximum scan angle to ±12.5°, set the scaling factor to 0.8 V/° by placing a jumper across the pins as shown above. Similarly, the 0.5 V/° scaling
factor is provided to allow the full scan angle to be achieved using small input signals. In this case, the input voltage should be limited to ±6.25 V max.
External Enabling of the Driver Board
The drive electronics can be configured for external enabling by placing a jumper across pins 2 and 3 of JP4.

JP4
Once this has been done, the user can enable or disable the drive electronics by applying a 5 V CMOS signal to
J7 pin 4.
If a logic high or no signal is applied, the drive electronics will be enabled. If a logic low signal is applied, then the driver will be disabled.
| Pin | Designation |
|---|---|
| 1 | Command Input +ve |
| 2 | Command Input -ve |
| 3 | No Connect |
| 4 | External Enable |
| 5 | -12 V Output |
| 6 | +12 V Output |
| 7 | Ground |
| 8 | Ground |

J7
The curves below show the reflection data for the coated mirrors supplied with the GVS series galvo systems. The shaded regions denote the ranges over which we recommend using the respective coating. Please note that the reflectance outside of these bands is not as rigorously monitored in quality control, and can vary from lot to lot, especially in out-of-band regions where the reflectance is fluctuating or sloped.
| Damage Threshold Specifications | |
|---|---|
| Item # Prefix | Damage Threshold |
| GVS00- | 3 J/cm2 at 1064 nm, 10 ns |
| GVS10- | 2 J/cm2 at 1064 nm, 10 ns |
| GVS20- | 0.25 J/cm2 at 532 nm, 10 ns |
Damage Threshold Data for Thorlabs' Small Beam Diameter Scanning Galvo Mirror Systems
The specifications to the right are measured data for Thorlabs' small beam diameter scanning galvo mirror systems. Damage threshold specifications are constant for a given item number prefix, regardless of the number of drivers or measuring system.
Laser Induced Damage Threshold Tutorial
The following is a general overview of how laser induced damage thresholds are measured and how the values may be utilized in determining the appropriateness of an optic for a given application. When choosing optics, it is important to understand the Laser Induced Damage Threshold (LIDT) of the optics being used. The LIDT for an optic greatly depends on the type of laser you are using. Continuous wave (CW) lasers typically cause damage from thermal effects (absorption either in the coating or in the substrate). Pulsed lasers, on the other hand, often strip electrons from the lattice structure of an optic before causing thermal damage. Note that the guideline presented here assumes room temperature operation and optics in new condition (i.e., within scratch-dig spec, surface free of contamination, etc.). Because dust or other particles on the surface of an optic can cause damage at lower thresholds, we recommend keeping surfaces clean and free of debris. For more information on cleaning optics, please see our Optics Cleaning tutorial.
Testing Method
Thorlabs' LIDT testing is done in compliance with ISO/DIS 11254 and ISO 21254 specifications.
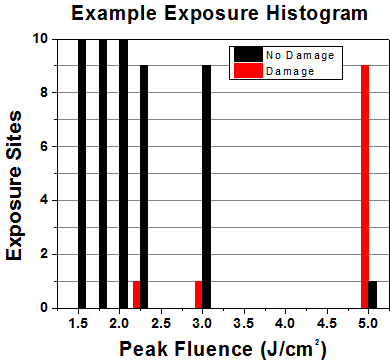
First, a low-power/energy beam is directed to the optic under test. The optic is exposed in 10 locations to this laser beam for 30 seconds (CW) or for a number of pulses (pulse repetition frequency specified). After exposure, the optic is examined by a microscope (~100X magnification) for any visible damage. The number of locations that are damaged at a particular power/energy level is recorded. Next, the power/energy is either increased or decreased and the optic is exposed at 10 new locations. This process is repeated until damage is observed. The damage threshold is then assigned to be the highest power/energy that the optic can withstand without causing damage. A histogram such as that below represents the testing of one BB1-E02 mirror.
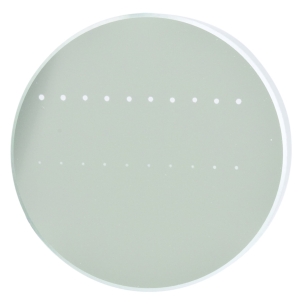
The photograph above is a protected aluminum-coated mirror after LIDT testing. In this particular test, it handled 0.43 J/cm2 (1064 nm, 10 ns pulse, 10 Hz, Ø1.000 mm) before damage.
| Example Test Data | |||
|---|---|---|---|
| Fluence | # of Tested Locations | Locations with Damage | Locations Without Damage |
| 1.50 J/cm2 | 10 | 0 | 10 |
| 1.75 J/cm2 | 10 | 0 | 10 |
| 2.00 J/cm2 | 10 | 0 | 10 |
| 2.25 J/cm2 | 10 | 1 | 9 |
| 3.00 J/cm2 | 10 | 1 | 9 |
| 5.00 J/cm2 | 10 | 9 | 1 |
According to the test, the damage threshold of the mirror was 2.00 J/cm2 (532 nm, 10 ns pulse, 10 Hz, Ø0.803 mm). Please keep in mind that these tests are performed on clean optics, as dirt and contamination can significantly lower the damage threshold of a component. While the test results are only representative of one coating run, Thorlabs specifies damage threshold values that account for coating variances.
Continuous Wave and Long-Pulse Lasers
When an optic is damaged by a continuous wave (CW) laser, it is usually due to the melting of the surface as a result of absorbing the laser's energy or damage to the optical coating (antireflection) [1]. Pulsed lasers with pulse lengths longer than 1 µs can be treated as CW lasers for LIDT discussions.
When pulse lengths are between 1 ns and 1 µs, laser-induced damage can occur either because of absorption or a dielectric breakdown (therefore, a user must check both CW and pulsed LIDT). Absorption is either due to an intrinsic property of the optic or due to surface irregularities; thus LIDT values are only valid for optics meeting or exceeding the surface quality specifications given by a manufacturer. While many optics can handle high power CW lasers, cemented (e.g., achromatic doublets) or highly absorptive (e.g., ND filters) optics tend to have lower CW damage thresholds. These lower thresholds are due to absorption or scattering in the cement or metal coating.
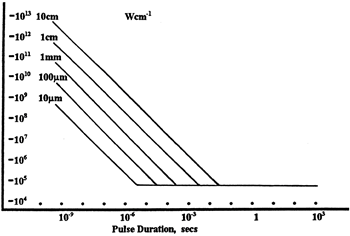
LIDT in linear power density vs. pulse length and spot size. For long pulses to CW, linear power density becomes a constant with spot size. This graph was obtained from [1].
Pulsed lasers with high pulse repetition frequencies (PRF) may behave similarly to CW beams. Unfortunately, this is highly dependent on factors such as absorption and thermal diffusivity, so there is no reliable method for determining when a high PRF laser will damage an optic due to thermal effects. For beams with a high PRF both the average and peak powers must be compared to the equivalent CW power. Additionally, for highly transparent materials, there is little to no drop in the LIDT with increasing PRF.
In order to use the specified CW damage threshold of an optic, it is necessary to know the following:
- Wavelength of your laser
- Beam diameter of your beam (1/e2)
- Approximate intensity profile of your beam (e.g., Gaussian)
- Linear power density of your beam (total power divided by 1/e2 beam diameter)
Thorlabs expresses LIDT for CW lasers as a linear power density measured in W/cm. In this regime, the LIDT given as a linear power density can be applied to any beam diameter; one does not need to compute an adjusted LIDT to adjust for changes in spot size, as demonstrated by the graph to the right. Average linear power density can be calculated using the equation below.

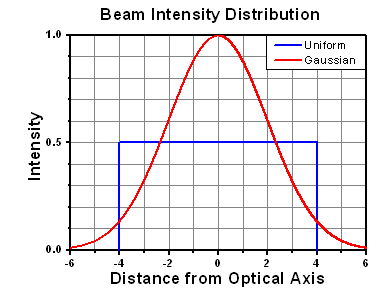
The calculation above assumes a uniform beam intensity profile. You must now consider hotspots in the beam or other non-uniform intensity profiles and roughly calculate a maximum power density. For reference, a Gaussian beam typically has a maximum power density that is twice that of the uniform beam (see lower right).
Now compare the maximum power density to that which is specified as the LIDT for the optic. If the optic was tested at a wavelength other than your operating wavelength, the damage threshold must be scaled appropriately. A good rule of thumb is that the damage threshold has a linear relationship with wavelength such that as you move to shorter wavelengths, the damage threshold decreases (i.e., a LIDT of 10 W/cm at 1310 nm scales to 5 W/cm at 655 nm):

While this rule of thumb provides a general trend, it is not a quantitative analysis of LIDT vs wavelength. In CW applications, for instance, damage scales more strongly with absorption in the coating and substrate, which does not necessarily scale well with wavelength. While the above procedure provides a good rule of thumb for LIDT values, please contact Tech Support if your wavelength is different from the specified LIDT wavelength. If your power density is less than the adjusted LIDT of the optic, then the optic should work for your application.
Please note that we have a buffer built in between the specified damage thresholds online and the tests which we have done, which accommodates variation between batches. Upon request, we can provide individual test information and a testing certificate. The damage analysis will be carried out on a similar optic (customer's optic will not be damaged). Testing may result in additional costs or lead times. Contact Tech Support for more information.
Pulsed Lasers
As previously stated, pulsed lasers typically induce a different type of damage to the optic than CW lasers. Pulsed lasers often do not heat the optic enough to damage it; instead, pulsed lasers produce strong electric fields capable of inducing dielectric breakdown in the material. Unfortunately, it can be very difficult to compare the LIDT specification of an optic to your laser. There are multiple regimes in which a pulsed laser can damage an optic and this is based on the laser's pulse length. The highlighted columns in the table below outline the relevant pulse lengths for our specified LIDT values.
Pulses shorter than 10-9 s cannot be compared to our specified LIDT values with much reliability. In this ultra-short-pulse regime various mechanics, such as multiphoton-avalanche ionization, take over as the predominate damage mechanism [2]. In contrast, pulses between 10-7 s and 10-4 s may cause damage to an optic either because of dielectric breakdown or thermal effects. This means that both CW and pulsed damage thresholds must be compared to the laser beam to determine whether the optic is suitable for your application.
| Pulse Duration | t < 10-9 s | 10-9 < t < 10-7 s | 10-7 < t < 10-4 s | t > 10-4 s |
|---|---|---|---|---|
| Damage Mechanism | Avalanche Ionization | Dielectric Breakdown | Dielectric Breakdown or Thermal | Thermal |
| Relevant Damage Specification | No Comparison (See Above) | Pulsed | Pulsed and CW | CW |
When comparing an LIDT specified for a pulsed laser to your laser, it is essential to know the following:
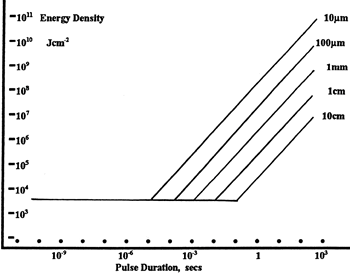
LIDT in energy density vs. pulse length and spot size. For short pulses, energy density becomes a constant with spot size. This graph was obtained from [1].
- Wavelength of your laser
- Energy density of your beam (total energy divided by 1/e2 area)
- Pulse length of your laser
- Pulse repetition frequency (prf) of your laser
- Beam diameter of your laser (1/e2 )
- Approximate intensity profile of your beam (e.g., Gaussian)
The energy density of your beam should be calculated in terms of J/cm2. The graph to the right shows why expressing the LIDT as an energy density provides the best metric for short pulse sources. In this regime, the LIDT given as an energy density can be applied to any beam diameter; one does not need to compute an adjusted LIDT to adjust for changes in spot size. This calculation assumes a uniform beam intensity profile. You must now adjust this energy density to account for hotspots or other nonuniform intensity profiles and roughly calculate a maximum energy density. For reference a Gaussian beam typically has a maximum energy density that is twice that of the 1/e2 beam.
Now compare the maximum energy density to that which is specified as the LIDT for the optic. If the optic was tested at a wavelength other than your operating wavelength, the damage threshold must be scaled appropriately [3]. A good rule of thumb is that the damage threshold has an inverse square root relationship with wavelength such that as you move to shorter wavelengths, the damage threshold decreases (i.e., a LIDT of 1 J/cm2 at 1064 nm scales to 0.7 J/cm2 at 532 nm):

You now have a wavelength-adjusted energy density, which you will use in the following step.
Beam diameter is also important to know when comparing damage thresholds. While the LIDT, when expressed in units of J/cm², scales independently of spot size; large beam sizes are more likely to illuminate a larger number of defects which can lead to greater variances in the LIDT [4]. For data presented here, a <1 mm beam size was used to measure the LIDT. For beams sizes greater than 5 mm, the LIDT (J/cm2) will not scale independently of beam diameter due to the larger size beam exposing more defects.
The pulse length must now be compensated for. The longer the pulse duration, the more energy the optic can handle. For pulse widths between 1 - 100 ns, an approximation is as follows:

Use this formula to calculate the Adjusted LIDT for an optic based on your pulse length. If your maximum energy density is less than this adjusted LIDT maximum energy density, then the optic should be suitable for your application. Keep in mind that this calculation is only used for pulses between 10-9 s and 10-7 s. For pulses between 10-7 s and 10-4 s, the CW LIDT must also be checked before deeming the optic appropriate for your application.
Please note that we have a buffer built in between the specified damage thresholds online and the tests which we have done, which accommodates variation between batches. Upon request, we can provide individual test information and a testing certificate. Contact Tech Support for more information.
[1] R. M. Wood, Optics and Laser Tech. 29, 517 (1998).
[2] Roger M. Wood, Laser-Induced Damage of Optical Materials (Institute of Physics Publishing, Philadelphia, PA, 2003).
[3] C. W. Carr et al., Phys. Rev. Lett. 91, 127402 (2003).
[4] N. Bloembergen, Appl. Opt. 12, 661 (1973).
In order to illustrate the process of determining whether a given laser system will damage an optic, a number of example calculations of laser induced damage threshold are given below. For assistance with performing similar calculations, we provide a spreadsheet calculator that can be downloaded by clicking the button to the right. To use the calculator, enter the specified LIDT value of the optic under consideration and the relevant parameters of your laser system in the green boxes. The spreadsheet will then calculate a linear power density for CW and pulsed systems, as well as an energy density value for pulsed systems. These values are used to calculate adjusted, scaled LIDT values for the optics based on accepted scaling laws. This calculator assumes a Gaussian beam profile, so a correction factor must be introduced for other beam shapes (uniform, etc.). The LIDT scaling laws are determined from empirical relationships; their accuracy is not guaranteed. Remember that absorption by optics or coatings can significantly reduce LIDT in some spectral regions. These LIDT values are not valid for ultrashort pulses less than one nanosecond in duration.

A Gaussian beam profile has about twice the maximum intensity of a uniform beam profile.
CW Laser Example
Suppose that a CW laser system at 1319 nm produces a 0.5 W Gaussian beam that has a 1/e2 diameter of 10 mm. A naive calculation of the average linear power density of this beam would yield a value of 0.5 W/cm, given by the total power divided by the beam diameter:

However, the maximum power density of a Gaussian beam is about twice the maximum power density of a uniform beam, as shown in the graph to the right. Therefore, a more accurate determination of the maximum linear power density of the system is 1 W/cm.
An AC127-030-C achromatic doublet lens has a specified CW LIDT of 350 W/cm, as tested at 1550 nm. CW damage threshold values typically scale directly with the wavelength of the laser source, so this yields an adjusted LIDT value:

The adjusted LIDT value of 350 W/cm x (1319 nm / 1550 nm) = 298 W/cm is significantly higher than the calculated maximum linear power density of the laser system, so it would be safe to use this doublet lens for this application.
Pulsed Nanosecond Laser Example: Scaling for Different Pulse Durations
Suppose that a pulsed Nd:YAG laser system is frequency tripled to produce a 10 Hz output, consisting of 2 ns output pulses at 355 nm, each with 1 J of energy, in a Gaussian beam with a 1.9 cm beam diameter (1/e2). The average energy density of each pulse is found by dividing the pulse energy by the beam area:

As described above, the maximum energy density of a Gaussian beam is about twice the average energy density. So, the maximum energy density of this beam is ~0.7 J/cm2.
The energy density of the beam can be compared to the LIDT values of 1 J/cm2 and 3.5 J/cm2 for a BB1-E01 broadband dielectric mirror and an NB1-K08 Nd:YAG laser line mirror, respectively. Both of these LIDT values, while measured at 355 nm, were determined with a 10 ns pulsed laser at 10 Hz. Therefore, an adjustment must be applied for the shorter pulse duration of the system under consideration. As described on the previous tab, LIDT values in the nanosecond pulse regime scale with the square root of the laser pulse duration:

This adjustment factor results in LIDT values of 0.45 J/cm2 for the BB1-E01 broadband mirror and 1.6 J/cm2 for the Nd:YAG laser line mirror, which are to be compared with the 0.7 J/cm2 maximum energy density of the beam. While the broadband mirror would likely be damaged by the laser, the more specialized laser line mirror is appropriate for use with this system.
Pulsed Nanosecond Laser Example: Scaling for Different Wavelengths
Suppose that a pulsed laser system emits 10 ns pulses at 2.5 Hz, each with 100 mJ of energy at 1064 nm in a 16 mm diameter beam (1/e2) that must be attenuated with a neutral density filter. For a Gaussian output, these specifications result in a maximum energy density of 0.1 J/cm2. The damage threshold of an NDUV10A Ø25 mm, OD 1.0, reflective neutral density filter is 0.05 J/cm2 for 10 ns pulses at 355 nm, while the damage threshold of the similar NE10A absorptive filter is 10 J/cm2 for 10 ns pulses at 532 nm. As described on the previous tab, the LIDT value of an optic scales with the square root of the wavelength in the nanosecond pulse regime:

This scaling gives adjusted LIDT values of 0.08 J/cm2 for the reflective filter and 14 J/cm2 for the absorptive filter. In this case, the absorptive filter is the best choice in order to avoid optical damage.
Pulsed Microsecond Laser Example
Consider a laser system that produces 1 µs pulses, each containing 150 µJ of energy at a repetition rate of 50 kHz, resulting in a relatively high duty cycle of 5%. This system falls somewhere between the regimes of CW and pulsed laser induced damage, and could potentially damage an optic by mechanisms associated with either regime. As a result, both CW and pulsed LIDT values must be compared to the properties of the laser system to ensure safe operation.
If this relatively long-pulse laser emits a Gaussian 12.7 mm diameter beam (1/e2) at 980 nm, then the resulting output has a linear power density of 5.9 W/cm and an energy density of 1.2 x 10⁻⁴ J/cm2 per pulse. This can be compared to the LIDT values for a WPQ10E-980 polymer zero-order quarter-wave plate, which are 5 W/cm for CW radiation at 810 nm and 5 J/cm2 for a 10 ns pulse at 810 nm. As before, the CW LIDT of the optic scales linearly with the laser wavelength, resulting in an adjusted CW value of 6 W/cm at 980 nm. On the other hand, the pulsed LIDT scales with the square root of the laser wavelength and the square root of the pulse duration, resulting in an adjusted value of 55 J/cm2 for a 1 µs pulse at 980 nm. The pulsed LIDT of the optic is significantly greater than the energy density of the laser pulse, so individual pulses will not damage the wave plate. However, the large average linear power density of the laser system may cause thermal damage to the optic, much like a high-power CW beam.
| Posted Comments: | |
pan pan
(posted 2024-11-12 00:57:21.087) 我想要知道如何使用labview或者c#语言书写控制软件来控制这台二维振镜? cstroud
(posted 2024-11-22 09:56:22.0) Thanks for reaching out. Our Galvo mirror systems are controlled via analogue voltage inputs, which would be provided by an external voltage source. The software required to control the input would be related to whichever input source you decide to use. 成龙 姜
(posted 2024-10-19 03:46:45.44) 您好!在我的驱动系统中J6口的1号引脚在J71、2号引脚输入模拟信号后始终为0V,而在半个月之前还能正常使用,请问我应该如何解决这个问题?谢谢您。 dnewnham
(posted 2024-11-07 05:56:00.0) Thank you for your inquiry, I will reach out to you directly to discuss your application dnewnham
(posted 2024-11-07 05:56:00.0) Thank you for your inquiry, I will reach out to you directly to discuss your application zaixing wen
(posted 2024-10-10 16:53:14.087) 您好,我想利用您的GVS002振镜搭建一套中心波段840nm,带宽40nm的OCT系统,请问扫描部分还需要一些什么配件 spolineni
(posted 2024-10-17 09:59:54.0) Thank you for reaching out! I’ll contact you personally to discuss your OCT system requirements with the GVS002 galvanometer and recommend the necessary accessories we can offer for the scanning setup. user
(posted 2024-08-22 21:38:05.18) I tend to use dual axis kit for free space communication. Does is suitable for that application? What software is used for simulation? dnewnham
(posted 2024-09-02 03:38:55.0) Thank you for your inquiry. These parts do not have an associated software and are instead designed to be used in conjunction with a DAQ card or signal generator that you will have to provide yourself which will include the software you need. Some recommendations for DAQ cards include: NI USB-6211, NI USB-6003, or NI USB-6008. I will reach out to discuss your application and the suitability of these device further with you. Huabing Tan
(posted 2024-07-23 01:27:45.987) 您好!我们采购了贵司一套GVS002 - 二维振镜系统,我们在使用的过程中发现两个问题,想确认下这两个问题。问题1:我们在实验中发现,由函数发生器DAQ卡来操作伺服驱动器时,函数发生器DAQ卡生成驱动信号到振镜接收到信号到达指定位置有延迟现象,而且延迟的时间与固有的电气回路长度和驱动信号有关。关于问题1,我想知道的是振镜的延迟跟什么因素有关,这个延迟的时间怎么通过理论计算出来?问题2:我们将二维振镜的X轴和Y轴的振镜扫描位置反馈信号(J6诊断接头的引脚1和8)接出到示波器看振镜实际扫描位置;振镜X轴快轴驱动信号为三角波信号,振镜Y轴慢轴驱动信号为阶梯信号;在样的驱动信号下我们发现,当振镜Y轴慢轴固定不动,振镜X轴快轴做横向扫描,从左往右扫描到最右侧再往回(从右往左)时在拐点附近Y轴的振镜扫描位置反馈信号会有波动(但此时Y轴的驱动信号一直是个定值,Y轴慢轴固定不动),振镜X轴和Y轴分别有对应的驱动板,按道理Y轴的振镜扫描位置反馈信号不会受振镜X轴的影响,请问Y轴的振镜扫描位置反馈信号出现波动的原因是什么?是否可以避免出现这一波动?以上就是我的两个问题,期待回复!谢谢! Daniel Kang
(posted 2024-06-17 12:32:53.587) I am going to use GVS002.
In manual, servo driver needs 15V & 1.25 rms A ( peak 5A)
If galvo does low frequency less than 100Hz (sine) and low angle less than 2V, 15V and 3A of power supply is enogh to drive in stable? spolineni
(posted 2024-06-25 08:24:38.0) Thank you for your inquiry. To ensure optimal performance of your GVS002 servo driver across all sweeping angles, we recommend using a 15V power supply capable of providing 1.25 RMS A, peak of 5A. Please note that we have not specifically tested the system with 15V and 3A power supply. As a cautious measure, we advise following the recommended specifications for best results. Vítor Rodrigues
(posted 2024-01-12 08:52:26.54) Greetings! We are currently utilizing the GVS002 and, as of now, we would like to devise an external controller which, among other things, would further compensate the oscillatory transient response of the device (as the internal PD controller is not sufficient for our application), but a few parameters weren't provided.
Does someone have any (or all) of the following parameters?
- Torque Constant for the rotor
- Counter EMF constant (if different from Torque Constant)
- Viscous friction coefficient for the rotor
- Spring constant for the control spring/suspension spolineni
(posted 2024-01-18 01:45:13.0) Hello Vítor, Thank you for your enquiry. I will reach out to you directly to assist you further. Marzanna Sz
(posted 2023-05-31 13:20:21.957) Hi,
I am using small beam diameter galvo system kit. In description, you stated to provide all necessary cables. I got cables connecting galvo mirrors with the power supplies, but I cannot find cables to connect driver cards with PCI card. Are you providing it too in the kit because mine is missing ?
Regards,
Marzanna Conner Phillips
(posted 2023-05-25 12:48:29.223) Greetings,
We are looking at the GVS002 for OCT applications. The GCM102 looks nice at first glance, but we would like to have a cage system after the output to enable use of a dichroic mirror and optical camera. Is there an easy way to couple a cage to the output of the GCM102 or would a GVS012/M with GCM012/M be more appropriate? fguzman
(posted 2023-06-22 06:47:48.0) Thanks for your enquiry. The difference with the GVS012 and GVS012/M, is that the first is the imperial version and the second is the metric version. So you would need this and the galvo to be the same versions, but apart from the dimensions and threads, there is no application difference. Regarding the use of the GCM102 you could use the CP38T (https://www.thorlabs.com/thorproduct.cfm?partnumber=CP38T). I will contact you directly to further discuss your application. Zhichao YANG
(posted 2023-04-13 21:33:21.16) I am using an original PSU and GVS002 system, which has been adjusted to 230V. When the motor is not connected, the PSU indicator light is green.
However, when the motor is connected, the indicator light does not turn on and the motor does not produce normal working sounds. How can I resolve this issue? How can I confirm if the motor is functioning properly? JReeder
(posted 2023-04-17 03:33:50.0) Thank you for your enquiry. I will reach out to you directly to assist with troubleshooting the issue. Kibeom Park
(posted 2023-03-14 13:33:15.95) I am using the 1300nm OCT system. Could you make the
galvanometer coating with Dielectric (-E04)? JReeder
(posted 2023-03-20 07:25:54.0) Thank you for your enquiry. Our custom solutions team will reach out to you to discuss feasibility of the custom mirror coatings for this Galvo range. Ekaterina Osipova
(posted 2022-10-10 19:47:38.457) We are replacing our galvo GSV002 with QS7XY-AG and are wondering if we need to replace the power supply as well. DJayasuriya
(posted 2022-10-11 08:28:55.0) Thank you for your inquiry. Unfortuantely you wouldn't be able to use the same power supply. GPWR15 would be the poser supply for the QS7XY-AG. If you do have any question please do not hesitate to reach out to your local tech support team. zhou shaopu
(posted 2022-07-12 14:01:54.9) The connection of the device could be detected, but we cannot controll the motor by NI device monitor.
We checked the connection of each line and found nothing. As we touching the connector of the miror , there is some buzzing given by motor. Sicheng Lu
(posted 2022-07-09 22:31:53.093) When I use the mirror without being turned, it makes a buzzer noise when I check by hand if the connection end is not making good contact. This is the first time I have encountered this, and I have never encountered it in my previous use. What is the reason for this situation? cwright
(posted 2022-07-12 08:03:09.0) Response from Charles at Thorlabs: Thank you for contacting us. This is usually the result of mixing up the driver boards, which are calibrated to a specific motor. We will reach out to help with troubleshooting. Bright Lu
(posted 2022-06-23 14:14:34.767) Hi,
I'm currently setting up the GVS202 system and just wanted to confirm that a DAQ card is necessary to control the servo driver boards, and ask if any alternatives exist. I also wanted to inquire if the heatsinking of the GCM102 is sufficient for more vigorous applications. Thank you! DJayasuriya
(posted 2022-06-27 06:33:00.0) Thank you for your inquiry. Yes that is correct you would need a DAQ card to control GVS202, alternatively you can use a function generator to control. please see chapter 4 of : https://www.thorlabs.com/drawings/d5cf9d9706145e14-6F4EE7C0-D3DC-36CF-918EA96A820ADFAC/GVS202-Manual.pdf
Regarding you applications we will get in touch shortly. user
(posted 2022-05-31 16:54:34.19) What is the screw size for the central bolt attaching the heatsink for the control board? (Fig. 3.8, center bolt attaching at the point of thermal paste application, not the M3 screws called out)
Thanks! cwright
(posted 2022-06-01 08:40:11.0) Response from Charles at Thorlabs: Thank you for your query. There are four holes on the back of that PCB mounting bracket. The two holes called out for mounting the heatsink are actually 3.5mm diameter unthreaded holes. The M3 thread is on the heatsink, which is why the manual calls for M3 threws here. The two other holes are M3 threaded and one of them is used to mount the component you refer to. user
(posted 2022-03-18 14:34:48.42) I am thinking of controlling GVS102 with DAQ.
How do I connect the +, -, and ground cables to the BNC connector on the J7? cwright
(posted 2022-03-21 06:14:35.0) Response from Charles at Thorlabs: Thank you for contacting us. The GVS102 comes with a male connector compatible with the J7 connector on the board. In the manual, section B.1 Electrical Connections, describes how to wire the J7 pins to your DAQ card. If you are using the Standard O/P configuration then Pin 1 is connected to the central pin on the BNC and Pins 2 and 8 are both connected to the return, "-", of the BNC. If you are using the Differential configuration then the ground of the DAQ and the GVS must be connected but Pins 1 and 2 are connected to the inverted and non-inverted output of DAQ. Your DAQ will detail how this is done. Most likely the non-inverted output would be on the signal, "+", pin of the BNC and the inverted output on the "-" of the BNC. HSIANG-CHIEH LEE
(posted 2021-04-12 15:33:50.33) Dear Thorlabs staff,
I have one question about the cable length for the scanning unit GVS-002. Based on the specification, the default cable length for the input of the driving signal is limited to 50 cm. Is it possible, we can have a customized version where the cable length is increased to 2 meters?
Thanks,
Sincerely,
Hsiang-Chieh cwright
(posted 2021-04-13 03:58:31.0) Response from Charles at Thorlabs: Thank you for your query. The cable between the board and the motor is 1m as standard and the wires supplied to provide a driving signal from a DAQ or function generator are also 1m. I will reach out to you to confirm which cables we are discussing and to provide options. Soham Pal
(posted 2021-03-23 15:24:30.95) Hello,
I am a postdoc in AMOP lab at Cavendish Laboratory, University of Cambridge. We are building a new confocal setup and are interested in the scanning galvo mirrors. Could you please tell me what is the settling time for the galvo, for GVSM002-EC/M kit?
Thank you cwright
(posted 2021-03-24 07:04:57.0) Response from Charles at Thorlabs: Hello and thank you for your query. The settling time for the GVS002 used in this kit is defined in the Key Specifications table as the Small Angle Step Response of 300µs. Andrew Lee
(posted 2021-01-25 10:04:03.41) HI,
for the two axis system, will it work with the input and output axis reversed, will this reduce the scan angle at all? cwright
(posted 2021-01-26 04:35:18.0) Response from Charles at Thorlabs: Thank you for your query. These were designed to be used with the input beam incident on the X-axis mirror. These have not been characterised for use in the reverse and we cannot state what the scan angle would be. Zhen Qiu
(posted 2020-08-11 12:28:23.677) Dear Thorlabs
we purchased a
GVS002 - 2D Galvo System, Silver-Coated Mirrors, last year
it is still under "Two year warranty. Incorporated light sources are warrantied for the lesser of one year or (to the extent applicable) the number of hours stated in the specifications."
currently, on the Y-axis (longer one), the mirror's edge got damaged
is there any chance to have a new mirror and replace the current one
if possible, we will provide you more details, by our student Cheng-you Yao
Thanks
Zhen cwright
(posted 2020-08-14 03:28:21.0) Response from Charles at Thorlabs: Hello Zhen and thank you for contacting us. Your local technical support team will reach out to you to discuss this damage and how we can proceed with a repair. yang yang
(posted 2020-07-27 20:50:00.827) GVSM002 除了接电源线,电机线,还需要接什么线,有人能指导一下怎么用吗? YLohia
(posted 2020-09-24 03:50:53.0) Thank you for contacting Thorlabs. An applications engineer from our team in China (techsupport-cn@thorlabs.com) has reached out to you directly regarding this. zhou fan
(posted 2020-04-23 16:03:47.67) 请问GVS202二维扫描振镜中两个反射镜的中心距离是多少?
GVSM002-EC/M电压怎么是230V?购买这个套装,搭建光学系统时,扫描振镜这边是否还需要购买其他配件? DJayasuriya
(posted 2020-04-27 05:37:41.0) Thank you for contacting Thorlabs. Our local tecusupport team will reach out to you for details. Christiaan Hulleman
(posted 2020-04-17 09:53:19.023) Out of the 3 sensitivity settings 1 V/deg 0.8 V/deg and 0.5 V/deg which one would be the most stable? I only need a small scan angle ~+-1 degrees but want each position to be as accurate as possible. Would it make sense to run it at 0.5 V/deg so it is less sensitive to noise? DJayasuriya
(posted 2020-04-20 07:06:52.0) Response from Dinuka at Thorlabs: Thank you for contacting us.Correct, the lowest sensitivity will have the highest signal/noise. Pay attention to V/deg or deg/V one is the opposite of the other. user
(posted 2020-04-10 15:23:43.87) Hi, What is the rest angle of the scanner? That is, what angle does it sit when no power is applied? It seems to be different than 45 degrees with respect to the frame. DJayasuriya
(posted 2020-04-15 04:58:04.0) Response from Dinuka at Thorlabs: Thank you for contacting us. Unfortunately the sitting position when unpowered is unknown because there’s no exact homing position brings the mirror back to a home position (like a spring in the typical spring loaded galvo). These types of galvos have no springs. DJayasuriya
(posted 2020-04-15 04:58:04.0) Response from Dinuka at Thorlabs: Thank you for contacting us. Unfortunately the sitting position when unpowered is unknown because there’s no exact homing position brings the mirror back to a home position (like a spring in the typical spring loaded galvo). These types of galvos have no springs. Alan Keenan
(posted 2020-01-21 11:52:01.44) On page 18 of the user guide, the following is written:
"The scanner accepts a differential analog command input. If the scaling is 0.8 Volt
per degree mechanical movement (see Section 3.3.5.), -10 V to +10 V gives -12.5
to +12.5 degrees mechanical movement. The driver will attempt to set the mirrorposition to the command input value."
If I was to apply 2.4V on the + input and -2.4V on the - input, does this mean the motor shaft will rotate 3 degrees in the clockwise direction, if i then change the polarity of the voltages, does this mean 3 degrees in the anti-clockwise direction? Also, can these systems be used with a single ended input voltage as indicated on page 19 of the user guide, so only a + V or -V is applied to pin 1 of J7, with pin 2 of J7 connected to GND. DJayasuriya
(posted 2020-01-31 06:02:20.0) Response from Dinuka at Thorlabs: Thank you for contacting us. I have reached out to you on your email request regarding this as well. Yes the degree of movement is controlled by input voltage supplied and reversing the polarity would change the direction of rotation. The sensitivity does not depend on the configuration: differential or single ended, but you would have to do the connection correctly. Hong Enoch
(posted 2019-12-24 01:37:20.42) Where can I buy a function generator/DAQ card and the corresponding controlling software? cwright
(posted 2020-01-02 06:36:05.0) Response from Charles at Thorlabs: Hello and thank you for contacting us. These galvos can be controlled through the J7 connector by using the included Molex cable kit and applying a voltage from -10V to +10V to the command input pins. Unfortunately we do not supply the required DAQ card or signal generator at this time. Details of the recommended specifications for this DAQ card are outlined on page 21 of the manual and since there are a number of providers for such hardware I cannot suggest a particular supplier. Christiaan Hulleman
(posted 2019-09-26 11:58:08.623) Do you have information about the phase shift between s and p polarised light at ~45 degrees AOI for any of the coatings? I presume the non dielectric ones would be closest to zero so I am most interested in those. Kind regards, Christiaan cwright
(posted 2019-09-30 08:43:12.0) Hello Christiaan. Thank you for contacting us. We do have some theoretical data for the gold and silver coatings but this is not something that we have tested for or can guarantee. I will reach out to you directly with the data. user
(posted 2019-04-27 11:15:27.99) Dear Thorlabs,
for our imaging application, we may need larger mirror surface, does Thorlabs provide different mirror on the galvo?
thank you
Zhen rmiron
(posted 2019-04-29 11:14:05.0) Response from Radu at Thorlabs: The galvanometric systems that we specify to be suitable for 10 mm beam diameters have larger mirrors. GVS012 is the large-beam version of GVS002. Unfortunately, if you require even larger mirrors, we can't offer anything suitable at the moment. Jan Pac
(posted 2019-04-16 12:45:12.06) Hi, I've read the other comments but I'm still a little bit confused about the speed of the 2D Galvos. I want to move my laser beam with a sinusoidal motion over an (optical) angle of 3°. As my angle is still too big for the small angle bandwidth, I multiply the angle with the full scale bandwidth (sinus) and get: 3°*250Hz= 750 deg/sec.
Now I'm interested in how many loops (=2*3° optical angle) I can do in 10ms. 750 deg/sec = 7.5 deg/(10ms), which would mean that I can only do a little bit over one loop in 10ms. Are my considerations above correct? Do you think that I can drive the galvos faster than the 250Hz if I'll only move them for +-1.5°? AManickavasagam
(posted 2019-04-23 09:29:36.0) Response from Arunthathi at Thorlabs: Thanks for your query. Though it is close to the specified limit for the galvo you should be able to achieve +/-1.5° at 250Hz. In this case you would be able to do at least 2.5 loops in 10 ms. If you would like to discuss further regarding the suitability for your application please contact the technical support team directly. c2dhgr
(posted 2018-12-13 23:13:34.357) Do you provide dual axis galvo mirrors with extended UV-ALuminium mirrors? rmiron
(posted 2018-12-17 04:46:39.0) Response from Radu at Thorlabs: We do provide such galvo systems upon request. Please contact your local technical support team if you would like a quotation for one. mskang
(posted 2018-11-29 18:34:32.333) hi, I am going to use GVS001 - x scanner.
If I use this GVS 001 for 1V angle & sawtooth 400Hz, is it having problem like as gittering or unlinear working? AManickavasagam
(posted 2018-11-30 12:03:52.0) Response from Arunthathi at Thorlabs: Thanks for your query. Unfortunately we are unable to guarantee the linearity specs with the settings you intend to use. The motor might not be capable of providing sufficient acceleration and the galvo drive port might be filtering the signal. We think it will be able to handle up to 250 Hz. We have tested the sine wave at small angles with which you could go up to 1 kHz, however we have not tested the other waveforms at such frequencies and at this point we are unable to comment on its performance at your required bandwidth. lvaldepe
(posted 2018-10-15 15:00:43.553) How may I be able to calculate the scan speed limit (mm/s)? AManickavasagam
(posted 2018-10-17 11:15:54.0) Response from Arunthathi @Thorlabs: Thanks for your query. The linear velocity you could achieve would depend on the waveform you are using. The achievable bandwidth for the different waveform are available in the spec table.
The higher the working distance the higher the linear velocity. However, a reliable measure would be to calculate the angular velocity but the maximum achievable would again depend on the waveform. loic.morvan
(posted 2018-08-06 18:14:25.74) Hello,
I would like to know the reference of the 3-pin connector on the PSU.
Many thanks by advance,
Best regards,
Loïc rmiron
(posted 2018-08-08 05:15:52.0) Response from Radu at Thorlabs: On page 6 of the power supply's manual, under section 2.6, you can find the pin diagram of its "Power Out" connector. As viewed from the front panel, the ground pin is the one on the bottom. v3kgdragonv
(posted 2018-06-19 00:47:21.19) Hello, I'm hanul. In order to control galvo system, do i need purchase not only galvo systme complete package but also another function generator or DAQ? AManickavasagam
(posted 2018-06-21 10:49:02.0) Response from Arunthathi at Thorlabs: Hi Hanul, thanks for your query. Yes, you will need to additionally use a function generator/DAQ card. I have contacted you directly to provide further information on the recommended specifications. svetlana.tatarkova
(posted 2018-06-04 14:51:49.637) Hi,
I have GVS series 2-x galvo system from ThorLabs. The cables from the mirrors are too short to go to the drive board. Do you supply the extension cables?
Regards, Svetlana. rmiron
(posted 2018-06-05 08:00:17.0) Response from Radu at Thorlabs: Hello Svetlana. We can supply you with extension cables as well. I will contact you directly to discuss the required length and the delivery details. phongtruongbk
(posted 2018-05-07 22:41:45.873) Hi Thorlabs,
I am Phong. I am planning to purchase a galvanometer system GVS001. I have a little confused in how to control the motor. I have read the manual but I am not quite sure I understand it. What I need is to send a command to the driver to steer the motor a certain angle ( 0.625 degree for example then back to 0, repeatable) as well as with a certain speed and track the encoder feedback to trigger my digitizer. Could you like to give me instruction or example in doing this?
Thank you. rmiron
(posted 2018-05-14 07:31:37.0) Response from Radu at Thorlabs: Hello Phong. The potential difference between pins 1 & 2 on the J7 connector of the driver board is linearly proportional to the angle of the mirror. Therefore, to move the mirror at a constant angular speed, you would need to shift that potential difference in a triangular pattern (0 to 0.5V for 0 to 0.625 degrees). I will contact you directly for more in-depth assistance. rmiron
(posted 2018-05-14 07:54:12.0) I forgot to mention that in order to read the position, you need to measure the potential difference between pins 1 & 8(ground) on the J6 connector of the same board. The scaling is different in this case, with 0.5V corresponding to a degree, as opposed to 0.8V corresponding to one degree when driving the scanner via the J7 connector. parksj003
(posted 2018-02-13 23:08:35.203) I am wondering that why mechanical resolution is different depending on Linear PSU and Standard Switch Mode PSU.
Thank you. bhallewell
(posted 2018-04-03 08:57:25.0) Response from Ben at Thorlabs: As the galvo drive board is not fully regulated from the power supply, the mechanical resolution is influenced by the noise characteristics of the supply. The mechanical resolution, is the smallest step which can be made against electrical noise. nahum
(posted 2017-10-11 05:06:19.397) I do not see anywhere the scan speed limit (degrees / second). bwood
(posted 2017-10-16 04:02:13.0) Response from Ben at Thorlabs: This can be calculated from the Full Scale Bandwidth or Small Angle Bandwidth (depending on travel you are using). This would be Bandwidth*Total Travel. For example, using the full scale travel of +/-12.5deg, you would calculate the speed as 12.5 * 2 * 100 = 2500deg/s. yala_b
(posted 2017-08-26 17:38:57.937) What specs of a Galvo XY scanner (e.g. small angle step response, the travelling angle) should I look for determining the scanning speed? bhallewell
(posted 2017-09-04 06:11:14.0) Response from Ben at Thorlabs: You can calculate this from the Full Scale Bandwidth or Small Angle Bandwidth (depending on travel). This would be Bandwidth*Total Travel. For full scale travel of +/-12.5deg this would be 12.5 * 2 * 100 = 2500deg/s. rnieuwland
(posted 2016-12-21 10:12:15.437) Dear Thorlabs,
We are experiencing problems with the flatness of the silver coated mirror. We see significant beam shape distortion (astigmatic) of a collimated beam reflected of the scan mirrors. Could this be a faulty mirror batch? Please advice.
Kind regards. bhallewell
(posted 2016-12-28 04:56:44.0) Response from Ben at Thorlabs: Thank you for your feedback here. We spec the flatness for our galvo mirrors to be λ/4 @ 632nm however beam distortion can be an inherent effect from the galvo scanner if producing light sheets without use of a scan lens (see the following link for further details - https://www.thorlabs.com/newgrouppage9.cfm?objectgroup_ID=2910)
Astigmatism can also be a factor which is inherent within a 2D galvo system, a result of generating horizontal & vertical lines from separate point source mirrors which are displaced by some distance.
https://archive.org/details/nasa_techdoc_19880016517
I will contact you to discuss this. gianmaria.calisesi
(posted 2016-12-16 16:48:02.753) Good evening, is it possible to have a Labview software to control the GVS001? kind regards tfrisch
(posted 2016-12-20 10:40:32.0) Hello, thank you for contacting Thorlabs. GVS001 requires a user generated drive signal, so you could use a DAQ or function generator that is controlled by LabVIEW. I will reach out to you about your application. fcouweleers
(posted 2016-11-07 12:27:36.01) is it possible to drive these scanner open-loop? tfrisch
(posted 2016-11-08 03:10:49.0) Hello, thank you for contacting Thorlabs. The motor control uses an encoder to read the position and calculate the drive current, so they are designed for closed-loop operation. takahashiyoshiy
(posted 2016-10-25 16:48:19.653) 現在GVS202を保有しておりますが、ミラーをGVS0かGVS1相当のミラーに変更する改造ができるでしょうか。 liang.chang
(posted 2016-07-23 11:50:43.327) I want to rotate a mirror from 0 degree to 12 degree, how much time it will take? I want to know the fast angle speed of the Scanning Galvo Mirror Systems, and if this speed have some relationship with other parameter,can you teach me how to calculated? bhallewell
(posted 2016-08-01 06:57:24.0) Response from Ben at Thorlabs: Thank you for your question here. Within our spec sheet we hold data for the Full Scale Bandwidth (DC to 100 Hz Square Wave, DC to 250 Hz Sine Wave) & Small Angle Bandwidth (±0.2°- DC to 1 kHz). Within this range the inertia of the mirror, duration of movement & temperature will impact on the precise timings of the motor. Testing this for a 0-6V square wave input range with a 0.5V/deg scaling, we obtained a 2ms timing for the mirror to move a full phase, meaning a 500Hz scan is possible with a square voltage input. maria.navas29
(posted 2016-06-16 14:03:34.637) It doesn't specify in the manual but I am wondering if there is a need for a thermal compound when attaching the heat sinks to both the mirrors and the driver boards. thanks! besembeson
(posted 2016-06-16 04:29:13.0) Response from Bweh at Thorlabs USA: This is not absolutely necessary but it is okay if you add this. robin.dupuy
(posted 2016-05-27 12:00:34.79) hello,
We are working on a OCT experiment and we would like to integate the 2d galvo mirror in a cage system. But it does not seem possible because we can not find a way to plug the
rodes from the cage system to the mirrors.
Have you ever encounter this problem ? Is there a
way to deals with it ?
Thank you in advance for your answer. bhallewell
(posted 2016-05-27 10:10:13.0) Response from Ben at Thorlabs: Thank you for posting, Robin. You are able to drop our GVS002(/M) into your 30mm cage system through use of the GCM002(/M) cage system adapter. The mirror/motor assemblies can very easily be removed from the GVS002(/M) & inserted into the adapter cube.
https://www.thorlabs.com/thorproduct.cfm?partnumber=GCM002/M
We hold a wide variety of cage system components to ensure you can successfully join this structure to the rest of your cage system. These can be found in the following link.
http://www.thorlabs.de/newgrouppage9.cfm?objectgroup_id=4125 lavicctoire
(posted 2015-04-10 04:13:28.623) hey, i am working on a co2 fractional laser that have 2D scanning for fractional mode.. but tha scanner got damaged and one motor is burned out so i want to know is there any solution so that i can replace that motor. i want only galvanometer scanning motor that compatible with my machine. bwood
(posted 2015-04-10 05:14:04.0) Response from Ben at Thorlabs: Thank you for your question. Usually, our 2D galvo motors are pre-calibrated to work in conjunction with our driver cards. Therefore, in this case I believe we will need to gather additional information on your system, so we can provide a solution to your issue. I will contact you directly for more information shortly. yassine1horma
(posted 2015-02-16 12:52:13.417) hello,
I need two control driver without engine power,
how much the price for both? msoulby
(posted 2015-02-17 04:24:21.0) Response from Mike at Thorlabs: We will contact you directly to discuss your requirements in more detail. ng7676
(posted 2015-01-19 19:41:21.733) How do we operate or control the galvo Mirror system(GVSM002/M)?
We are wondering whether you can provide the software or driver that is able to be applied into LabView or C+.
Or can provide the sample source that can be refferred into the development of application. bhallewell
(posted 2015-01-22 09:26:17.0) Response from Ben at Thorlabs: The galvo scanner system includes an accessible electronic drive card. Located on the card, a Molex receptacle accepting either a differential analogue command input or a directly proportionate command input (±10 V at a selectable scale of 1V per degree) will allow you to drive the scanner to a desired angular orientation. This input can be interfaced through assembly of an included Molex connected cable kit. As the unit holds an analogue input, you would need to supply your own DAQ card with DAC outputs to drive the galvo via these means you have highlighted. Further details of the recommended specifications for this DAC card are outlined on page 20 of the manual. https://www.thorlabs.de/thorcat/18700/GVSM002_M-Manual.pdf gesuele
(posted 2015-01-06 00:30:08.81) Dear Sirs
I would be interested to the galvano mirror system for laser scanning microscopy
Is not clear to me if you provide a computer controlled system, that can perform a raster scanning with labview code o similar. The same that you provide for the linear nanomax system.
Could you specify if this is actually possible or does the system need an additional DAQ, and home made software code?
Thanks for your feedback bhallewell
(posted 2015-01-08 05:06:25.0) Response from Ben at Thorlabs: Thank you for your enquiry. Our system includes the motorized galvo with respective drive cards from which mirror steering is achieved by a switchable input-voltage-to-mirror-angle control. The solution that we provide typically requires a user-supplied DAQ card to interface with computer control however the system can also be interfaced by an analogue voltage signal generator, should this meet the needs of your application. This is very much an ‘open source’ solution. chris.shuttle
(posted 2014-03-26 12:27:54.83) What is the smallest angle that the galvanometers can be operated at in step mode? For my application, based on the geometric setup I would need to be able to operate it in steps of less than equal to 0.1 degree if possible? msoulby
(posted 2014-03-27 05:58:55.0) Response from Mike at Thorlabs: The galvos are simply driven by an analogue voltage input of ±10V which corresponds to an angular range of ±12.5°. When used with our GPS011 linear power supply the motors are able to address 31250 points over the angular range of ±12.5°, this gives a resolution of 0.0008° (15µrad). With a standard switch mode power supply unit this drops to ~6250 points which gives a resolution of 0.004° (70µrad). You should easily be able to achieve the 0.1° steps that you require. bernardo
(posted 2014-01-15 14:54:05.63) Dear Thorlabs team, I needed to extend the cables from the galvo scanner to the driver. After I have done that, a schreeching sound can be heard from one of the scanners, I suppose that by changing the cable I changed the circuit calibration.Am I wrong? I have checked the wiring configuration, and it matches fine. If the circuit is discalibrated, can you send some instructions for tunning the circuit.
Thank you.
Bernardo msoulby
(posted 2014-01-16 09:07:06.0) Response from Mike at Thorlabs: Our galvo scanners are factory calibrated during production; this involves tuning each driver board to a specific galvo motor to take into account the different mass and inertia of the different shaped mirrors. There should be a serial number on the driver board that will correspond to one of you galvo motors. I would first ensure that these connections correspond. The galvos are tuned with a 1m long cable, using a longer cable will affect the performance such as the linearity, maximum bandwidth and field distortion, especially if used near the bandwidth limit. For short increases in length the effect of a longer cable will not be that noticeable and if it is a problem then we can offer a recalibration service to retune the board to suit the longer cables length. The screeching noise is not normal I have contacted you directly to help troubleshoot your problem. bagresci
(posted 2013-12-16 15:17:02.627) I am interested in 2D scanning by this mirror. However, I am afraid that a cage amount of one 2d scanning mirror will shift a center of beam from the center of 30mm cage amount. If it is, two 1d scanning mirror would be better to avoid that beam shifting? msoulby
(posted 2013-12-16 10:19:13.0) Response from Mike at Thorlabs: With careful alignment of the galvo motors in the GCM001 cube the beam pointing should still be on the center of the cage system optical axis. Please note that the direction of the input beam is also critical for achieving an on axis output and careful consideration should also be paid to this alignment. I have emailed you directly with more detailed instructions on how to fit the galvo motors to the GCM001 cage cube. xiajj
(posted 2013-05-06 21:17:37.263) Is there any way to synchronize the position with other device? for example, synchronize the starting position every time after one round data collection.
Thanks very much,
Jinjun jlow
(posted 2013-05-09 11:36:00.0) Response from Jeremy at Thorlabs: There are some output signals from the driver board one could possibly use for this. I will get in contact with you directly to discuss about this further. jlow
(posted 2013-02-21 14:26:00.0) Response from Jeremy at Thorlabs: You can operate this down to DC level. amirtahamtan
(posted 2013-01-24 07:32:36.51) Dear Thorlabs 's persons and manager,
Thank you very much for your good introduction in your web site i wish you very good selling and also good share of your business in the world.
Best regards,
Amir arashi
Nidco
amirtahamtan@gmail.com tcohen
(posted 2012-12-05 10:55:36.99) Response from Tim at Thorlabs: Thank you for contacting us. Please check that the scaling factor is set correctly, check jumper 7 on the driver board (see page 19 of the manual). Also, please check that the correct board is connected to the correct motor, as each board is specifically tuned for each mirror. If they are swapped it may cause them to operate out of spec. We will contact you directly to continue troubleshooting. eduardo.yukihara
(posted 2012-11-22 11:04:24.243) There is something in my system that does not make sense.
I have a plate ~23 cm from the galvo, and the full range of the scan in each axis is almost 15 cm (from -7.5V to +7.5 V), which corresponds to more than 30 degrees already.
The galvo was purchased as a package with all the power supply and heat sinks. The voltage is supplied by a NI DAQ board (max +/- 10 V) and I did not change the factory settings, which should be 1 deg/V.
So, I am not sure what I am missing... jlow
(posted 2012-08-06 08:36:00.0) Response from Jeremy at Thorlabs: Depending upon the noise component of the drive, voltage filtering may be required. One will have to check the noise specification on the drive circuitry against the application to see if low pass filtering is needed. To perform closed loop control, one would have to provide a feedback signal which creates the demand drive voltage for each axis. The gain of that loop will have to be determined based on the requirement for steering control. Unfortunately we do not have a write-up for doing this at the moment. chris.michaels
(posted 2012-08-01 14:50:56.0) I am thinking about how best to setup the GVS002 for a step and hold app/ Is there any benefit to low pass filtering the DC voltage send to the drive circuit? Also is there any knowledge base on how to operate these closed loop? I presume one can develop a control loop based on the position error and the drive voltage ? Thanks. tcohen
(posted 2012-07-03 11:18:00.0) Response from Tim at Thorlabs: The inputs only need a few mA to operate. For example, this DAQ card http://sine.ni.com/nips/cds/view/p/lang/en/nid/203224 has two outputs at 2mA or 4mA. This should be sufficient to operate the driver boards. Also, we can offer the GVS012 with gold mirrors as a special. raphael.turcotte
(posted 2012-07-02 11:50:20.0) Is there a minimal current required to control the GVS102 or GVS012 system with a DAQ analog ouput? Can the GVS012 be made with gold mirror? Best, RT. tcohen
(posted 2012-04-10 14:35:00.0) Response from Tim at Thorlabs: Thank you for your feedback! We will contact you directly to provide assistance. g0701080
(posted 2012-04-07 23:39:59.0) Hi, we want to build a scanning system for multi photon microscopy. Currently we already have the NIR laser and the microscope. we need a scanning box and also the tubelens. I am not sure what else component we need besides the x-y galvo scanner. Could you please send me a list including all the components for this purpose? Please contact me via email. Thank you. bdada
(posted 2012-02-13 18:16:00.0) Response from Buki at Thorlabs to jcha8:
Thank you for participating in our feedback forum. Yes, we have had quite a bit of interest in the UV version of our galvo mirrors and are working with our production team to see what we can offer. We will contact you with more information directly and post an update soon. jcha8
(posted 2012-02-12 21:40:57.0) Dear Thorlabs,
As the other people in below asked, I wonder if I can use UV range (266nm-340nm) to the galvo mirror system. We are now using your protected silver coated mirror, how is the reflectance for the 266-340nm? I know there's UV Enhanced and Protected Aluminum mirrors in your company. Customized version is available? How long will it be the leading time? I am looking forward the answers from you. bdada
(posted 2012-01-05 14:10:00.0) Response from Buki at Thorlabs:
Thank you for using our online feedback tool. You can use the galvo system with a square signal, but with reduced bandwidth. For the GVS001 and GVS002, the bandwidth is 100Hz for a Square wave and 350Hz for a Sine wave. Please refer to the "Specs" tab on the web page to get more information. dkunik
(posted 2012-01-04 11:49:03.0) Is it possible to drive the galvos with a square signal or it is necesary drive them with a smooth signal?
Thanks bdada
(posted 2011-11-08 18:33:00.0) Response from Buki at Thorlabs:
Thank you for your feedback. We may be able to provide a custom version of the galvo system for the UV range. We will contact you directly with more information. christian.eisele
(posted 2011-11-07 17:03:55.0) I would need the galvo system with mirrors for the
UV-range, roughly from 240-370 nm. How is the reflectivity of yor standard mirrors in this range?
Are you planning to offer mirrors for the galvo system and this wavelength range ? bdada
(posted 2011-10-03 15:35:00.0) Response from Buki at Thorlabs:
Thank you for your feedback. We are looking into the expansion of the mirrors offered with our Galvos and hope to offer a wider selection on our website soon. We have contacted you to discuss the specifications of the mirror you need so we can provide you with a quote. ymchang
(posted 2011-09-14 19:12:12.0) Dear Thorlab:
We used your GVSM002 for confocal microscope development. Recently, we are working on a scanning system with UV laser (325 nm) excitation. Just wonder if Thorlab can provide GVSM002 with UV-enhanced Al-coating scanning mirror and quote the price for us ? Your early response will be deeply appreciated.
Many Thanks.
Yuming
Research Fellow
Center for Condensed Matter Sciences,
National Taiwan University jjurado
(posted 2011-07-19 11:10:00.0) Response from Javier at Thorlabs to stevebegin: Thank you for contacting us. In order to mount the GVS002 galvos into the GCM002 cube, it is necessary to remove each galvo from the XY mount and the heatsink. The manual for the GCM002 highlights the mounting procedure in detail: http://www.thorlabs.com/Thorcat/19800/19830-D02.pdf stevebegin
(posted 2011-07-19 10:36:00.0) Is the GVS002 compatible with the GCM002 while in its XY mount and the heat sink or do we have to remove the galvo from the mount to insert them in the GCM002? jjurado
(posted 2011-07-13 11:34:00.0) Response from Javier at Thorlabs to compras: Thank you very much for submitting your inquiry. You can generate a .step file for the galvos themselves by modifying the Solidworks model and then converting it to a STEP file. I will send you the model for the galvos themselves shortly. compras
(posted 2011-07-12 17:43:36.0) Hi,
We have purchased a GVS002 galvo system few months ago. Now we are designing an experimental setup with other Thorlabs parts using the .step files available in your website ir order to choose the proper component for our experiment, but we cannot find an ".step" file for the galvo itself. There is only a 3D model for the GCM002 without the galvos. Have you got a 3D model for the galvos?
Thanks in advance.
Ulises jjurado
(posted 2011-06-21 10:57:00.0) Response from Javier at Thorlabs to last poster: Thank you very much for contacting us with your request. We currently have a technical drawing of the galvos that we can send you. Please contact us at techsupport@thorlabs.com so that we can discuss your requirements. user
(posted 2011-06-17 16:52:38.0) please add a mechanical drawing view that shows the dimensions of just the Galvo itself, i want to incorporate the device into my own mechanics. jjurado
(posted 2011-05-13 10:04:00.0) Response from Javier at Thorlabs to penditaaa: Thank you very much for contacting us with your request. In order to connect your BNC2120 NI DAQ card to the servo boards of the GVS012 galvo mirror system, all you need to do is wire each BNC analog output connector on the DAQ to the J7 command input connector on each servo board. Page 17 of the manual outlines the pin connections in detail:
http://www.thorlabs.us/Thorcat/20300/20381-D02.pdf
I will contact you directly for further support. penditaaa
(posted 2011-05-13 03:10:06.0) I want to make connection GVS012 to a BNC2120 and to LABVIEW2010 (NX) software. What is the connection needed between BNC2120 (NI) and GVS012? jjurado
(posted 2011-05-10 10:20:00.0) Response from Javier at Thorlabs to hak09_eee031: Thank you very much for contacting us. There are many DAQ cards that would be suitable for operating our galvo mirrors; however, as a suggestion, we think that National Instruments' NI USB-6212 is a good candidate for driving the galvos with high resolution and fast response. Below is the link for this DAQ card:
http://sine.ni.com/nips/cds/view/p/lang/en/nid/207096 jjurado
(posted 2011-05-10 10:03:00.0) Response from Javier at Thorlabs to song31037: Thank you very much for submitting your request. We can certainly offer extended cables for connecting the galvo mirrors to the servo boards. I will contact you directly to get a quotation started for you. hak09_eee031
(posted 2011-05-10 02:14:08.0) Can you suggest the suitable data acquisition card for the GVS002. I want to build the scanning system for OCT but I do not know what DAQ card to use. song31037
(posted 2011-05-10 11:49:30.0) Hi, Sir/Madam,
I want to receive the quotation of an long electrical cable (2 m) which connect the galvo scanner and the controll borad to send the operating signal and the voltage.
Would you give me the part number?
I heard that the long cable can be fabricated.
Send me e-mail.
Thank you. bdada
(posted 2011-04-29 15:27:00.0) Response from Buki at Thorlabs:
Thank you for your feedback. Due to the manufacturing process of the galvo units, these mirrors are permanently fixed in place. We can provide custom units with different mirrors installed but they cannot easily be replaced by the user. We have contacted you to discuss your application.
Please contact TechSupport@thorlabs.com if you have further questions. epetrik
(posted 2011-04-29 12:38:36.0) Is it possible for the user to buy and install replacement mirrors for these galvos? bdada
(posted 2011-04-07 14:12:00.0) Response from Buki at Thorlabs:
Below are the specifications on linearity. We will contact you directly to ensure that this data answers your questions.
Motor and Position Sensor
Linearity 99.9%
Scale Drift 40 ppm/°C (Max)
Zero Drift 10 µrad/°C (Max)
Repeatability 15 µrad
Resolution (Mechanical)
With GPS011 Linear PSU: 0.0008 ° (15 µrad)
With Standard Switch Mode PSU: 0.004° (70 µrad) sam.t.thurman
(posted 2011-04-06 18:32:54.0) Can you provide a spec on the angular wobble of the mirror perpendicular to the plane of rotation? jjurado
(posted 2011-04-04 14:07:00.0) Response from Javier at Thorlabs to Mathieu: Thank you very much for contacting us. It is certainly possible to fix the position of the scanning galvo mirrors by applying a DC voltage. For example, the GVS001 1D mirror has an angular translation of ±12.5°, with 0.8 V/deg scaling. For 5° translation, you would apply 4 VDC, and if you wanted the galvo to stay at that position, you would continuously apply this voltage. This principle makes the galvo mirrors very useful for steering, scaling, and aligning laser beams. I will contact you directly fir further assistance. mathieu.maisonneuve
(posted 2011-04-04 10:42:16.0) Is it possible to fix the position of the galvanometer with a DC voltage ? In our application, we want to have both step scanning and position fixing for deep analysis. Thanks, Mathieu jjurado
(posted 2011-03-16 14:01:00.0) Response from Javier at Thorlabs to magnasco: Thank you for contacting us with your question. You are correct, the full angle deflection of ±12.5° and resolution of 0.0008 ° (15 µrad) gives addressability to 31250 points. Note this is with the GPS011 power supply, only. With a standard switch mode power supply unit this drops to ~6250 points. magnasco
(posted 2011-03-16 00:44:01.0) Do I understand correctly that the repeatability of the galvos is such that I can address over 30000 points in the +/- 12 deg range? I.e. if I use this product to do a line laser scan, I can scan theoretically 30000 pixels per line? (By commanding it from a 16 bit DAC, obviously). jjurado
(posted 2011-03-01 13:14:00.0) Response from Javier at Thorlabs to coconeti: Thank you for contacting us. We currently do not offer software support for the GVS galvo mirrors. However, You can create a simple vi with virtually any data acquisiton card with bipolar analog outputs (+/-10V). National Instruments offers a variety of examples that you might be able to use. You can find one of them through the following link:
http://zone.ni.com/devzone/cda/epd/p/id/5774 coconeti
(posted 2011-02-28 15:56:16.0) Could you support any software to control the CVS012, such as lab view based one? jjurado
(posted 2011-02-21 09:30:00.0) Response from Javier at Thorlabs to hendrik.dettmer: Thank you for submitting your inquiry. The full scale bandwidth specifications for the GVS011 and GVS012 are 65 Hz for a square wave signal input, and 130 Hz for a sine wave input. These values translate to 15 ms (1/65 Hz) and 8 ms (1/130 Hz), respectively. The GVS011/012 should be able to sweep the 6.7 mm line in these times. hendrik.dettmer
(posted 2011-02-15 09:35:49.0) How fast (in which time) can the GVS012 be moved from one end of an 4.7 mm x 4.7 mm area to another. So from the left bottom point to the right top point of the given area? Javier
(posted 2010-10-08 03:37:15.0) Rsponse from Javier at Thorlabs to song30137: the material of the main body is aluminum. Thorlabs
(posted 2010-10-06 10:57:23.0) Response from Javier at Thorlabs to song31037: The material of the main body of the large galvo mirror systems is aluminum. I will get back to you with information on the exact type. song30137
(posted 2010-10-07 09:08:45.0) Can I ask one more thing?
IS the material of the main body of the samll galve aluminum (GVS002,GVS001)? song31037
(posted 2010-10-05 12:29:01.0) Whats the material of the body at GVS011?
Is this non magnetic material? user
(posted 2010-09-27 12:02:55.0) A response from Oli at Thorlabs to Liam: We can supply the galvo with mirrors for this wavelength as a special. However, unfortunately, if you already have a system with fixed (glued on) mirrors we cannot retrofit these at a later date. With the new galvo systems that have removable mirrors this could be retrofitted. I will email you directly with the specs and details. Many Regards, Oli l.a.mcdonnell
(posted 2010-09-23 11:35:15.0) Dear Sir/Madam
Is it possible to amend a Scanning Galvo Mirror System so that it can operate at 355 nm?
with best regards
Liam Thorlabs
(posted 2010-07-23 10:56:08.0) Response from Javier at Thorlabs to jripoll: Thank you for your feedback. We currently do not provide software/drivers for our galvo mirror systems. They are controlled through analog input, so it is relatively easy to develop an software application through LabVIEW or LabWindows/CVI, for example. You can then use a data acquisition card to provide the interface. We may be able to provide some examples that you can model your application after. I will contact you directly with more details. jripoll
(posted 2010-07-22 10:45:54.0) It is not clear how the galvo mirror is controlled. Does it come with labview compatible drivers like the T-cube?
Thanks!
Jorge Thorlabs
(posted 2010-07-19 11:39:03.0) Response from Javier at Thorlabs to n.marty: Thank you for your feedback. We currently do not have a galvo mirror system designed for a maximum beam diameter of 30 mm. I will propose this product to our design engineers. n.marty
(posted 2010-07-15 13:25:16.0) Your 2 axis galvo mirror system (GVS011/012) looks very interesting, however we are looking for bigger mirror size ( 30mm).
Do you have this type of product?
Best regards,
Nicolas Marty user
(posted 2010-06-01 19:39:23.0) response from Javier at Thorlabs to alee: Yes we do. Our LSM series scan lenses are M25x0.75 threaded. We offer thread adapters such as the SM1A12 which couple this thread onto our SM1 threaded components. For example, the SM1A12 is perfectly compatible with the GCM002 cage cube adapter for the GVS002. You could then mount any of the LSM scan lenses onto the SM1A12. alee
(posted 2010-06-01 18:14:14.0) does thorlabs make an adapter piece to attach their scan lenses to these scanner assemblies? apalmentieri
(posted 2009-12-18 13:10:41.0) A response from Adam at Thorlabs: The Galvo scanners we provide can operate as step controlled or continuous control. The type of control is dependent upon the waveform signal generated, for example, through a DAQ card controlling the Gavlo scanner. I will email you to get more information about your application. mo_kamal
(posted 2009-12-17 20:10:10.0) is it step control or only continous scanning? we are looking for step control galvo.............. |

- 1D and 2D Scanning Galvo Mirror Systems
- Silver, Gold, and Broadband (E02) Coating Options
- Includes 1 or 2 Driver Cards for Single or Dual Mirror Systems, Respectively
- Includes Driver Card Heat Sink(s)
- Power Supply Not Included
Thorlabs Scanning Galvo Mirror Systems are available in single and dual axis configurations for small (<5 mm) beam applications. A choice of mirror coatings is available as described above. Each 1D system includes one driver card, one driver card heat sink, and one single mirror system. Each 2D system includes two driver cards, two driver card heatsinks, and a dual mirror system. These galvo systems do not include a power supply, driver card cover, or galvo mirror heatsink, which are highly recommended for demanding applications where vigorous scanning and stability are required. These accessories are sold below and can be purchased separately.

| Kit Contentsa | |||
|---|---|---|---|
| Item # | Galvo System |
Power Supply |
Driver Card Cover(s) |
| GVSK1-US | GVS001 | GPS011-US | GCE001 |
| GVSK2-US | GVS002 | ||
| GVSK1-EC | GVS001 | GPS011-EC | |
| GVSK2-EC | GVS002 | ||
| GVSK1-JP | GVS001 | GPS011-JP | |
| GVSK2-JP | GVS002 | ||
- Each Kit Includes:
- GVS001 or GVS002 Galvo System
- Region-Specific Power Supply
- Driver Card Cover(s)
- All Necessary Cables
- Complete 1D or 2D Scanning 5 mm Galvo Mirror Systems
- Protected Silver Mirror Coating
- Optically Encoded Mirror Position
- 99.9% Motor and Position Sensor Linearity
- Advanced Analog Control Circuit (Servo Driver) with Current Damping and Error Limiter
The GVSK1 and GVSK2 Series Galvo Mirror System Kits include everything necessary for operating 1D or 2D scanning mirror systems for small diameter beams. These closed-loop systems are ideal for raster and vector scanning applications as well as some step-and-hold applications. The GVSK1 and GVSK2 series kits include the GVS001 and GVS002 silver-coated mirror systems, respectively, together with the GPS011-xx linear power supply and a GCE001 cover for the servo driver boards. The power supply can power two 1D scanning mirrors or one 2D scanning mirror assembly.
We highly recommend using the GHS003(/M) heatsink and post mounting adapter (sold separately below) to cool the galvo mirror for rapid scanning applications that necessitate additional heat dissipation.

- Compatible with Galvo Systems Above
- Low Noise, Linear Supply Minimizes Electrical Interference
- Capable of Powering Two Server Driver Cards Simultaneously
- Configured for Regional Voltage Requirements upon Shipping
These power supplies are low noise, linear supplies designed to minimize electrical interference for maximum system resolution. They deliver ±15 VDC at 3 A and are configured to accept a mains voltage of 115 VAC (for GPS011-US), 230 VAC (for GPS011-EC), or 100 VAC (for GPS011-JP). Each power supply is compatible with all of our galvo systems available above. Two 2 m (6.5') power cables are included.
As an alternative, a standard switching mode power supply may be used for low demand applications.

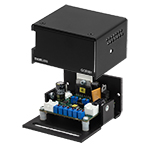
Click to Enlarge
The GCE001 can be used to cover the Galvo Systems' servo driver boards.
The GCE001 is a convenient enclosure for servo driver cards. Simply bolt it onto the servo driver bracket using the M3 screws and hex key supplied.
Note: This item is not compatible with early models of the servo driver card. Contact Tech Support for more details.

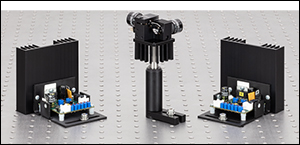
Click to Enlarge
2D Galvo System Mounted on Heatsink on a Ø1/2" Post
- Provides Additional Cooling to Prevent Thermal Cutout
- Attaches Directly to the 1D and 2D Mirror Mounts
- Convenient Post Adapter to Thorlabs’ 8-32 (M4) Threaded Posts
The GHS003 galvo mirror heatsink attaches directly to the single-axis and dual-axis mirror mounts to provide device cooling and alternate mounting options. Mounting screws are supplied with the unit.
Heat from the galvo mirrors is typically dissipated through the normal mounting options. However, applications involving rapidly changing drive signals can create excess heat buildup, causing the galvo motor to fail or driver board thermal cutout to trip. If the cutout occurs repeatedly, we recommend using the GHS003 Heatsink. The heatsink also serves as a post adapter, allowing the galvo mirror assembly to be mounted on our Ø1/2" 8-32 (M4) threaded posts.

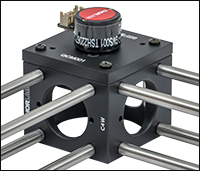
Click to Enlarge
Shown is a CM001 used to mount a GVS001 into a 30 mm cage system. Refer to the GCM001 manual for detailed instructions.
- Mount a 1D Galvo System into a 30 mm Cage System
- SM1-Threaded (1.035"-40) Port on Four Sides
- Four 4-40 Tapped Holes on Four Sides for Compatibility with Ø6 mm ER Series Cage Rods
- Bottom Face Features a Ø1.75" (44.5 mm) Through Hole for Additional Mounting Options
The GCM001 Cage System Adapter is used to mount the GVSX01 single-axis galvo systems into a 30 mm cage system. The adapter also features four SM1 threads and an open bottom for further mounting options.
Note: The input and output are on the same plane.


Click for Details
GCM102(/M) Mechanical Drawing

Click to Enlarge
Beam Path Shown Through the Input Port, Reflecting off Both Galvo Mirrors, and then Exiting Through the SM2-Threaded Output Port
- Mount a 2D Galvo System to a Post, 30 mm Cage System, or 66 mm Rail Carriage
- Internal SM05 (0.535"-40) and SM1 (1.035"-40) Threads on Input Port
- Internal SM2 (2.035"-40) Threads on Output Port
- Compatible with Thorlabs' Selection of Scan Lenses (See Compatibility Table Below)
Thorlabs' GCM102(/M) is designed to securely mount any dual-axis, small beam diameter galvo mirror system. Once installed in the mount, the galvo system can be attached to a post, 30 mm cage system, or 66 mm optical rail carriage, as shown in the images below.
The mount features an internally SM2-threaded (2.035"-40) output port that, when used with the proper adapter, allows any of our scan lenses to be attached at the proper scan distance from the galvo mirrors; see the compatibility table below for more details. The input port is both internally SM05- (0.535"-40) and SM1-threaded (1.035"-40) for direct compatibility with Ø1/2" and Ø1" lens tubes. Additionally, four 4-40 tapped holes centered around the input port provide compatibility with 30 mm cage systems. When each port is used in combination with our lens tubes, port plugs, and/or scan lenses, the system will be light tight. The input and output ports are centered around the X- and Y-axis galvo mirrors, respectively; please note that they are in different planes.
The bottom of the mount includes two 1/4"-20 (M6), three 8-32 (M4), and two 4-40 (M3) tapped mounting holes. Each mounting hole is aligned for compatibility with our C1511 (C1511/M) and C1545 (C1545/M) post clamp adapters; Ø1/2", Ø1", and Ø1.5" mounting posts; and XT66P2 (XT66P2/M) and XT66RC rail carriages, as shown in the images below. Please see section 3.3 of the manual for more details about the various mounting options available.
The X- and Y-axis galvo mirrors are mounted using the two through holes in the side and rear of the unit. A flexure clamp that is actuated using the included 5/64" (3 mm) hex key secures each galvo mirror in place. An SM05-threaded viewing port is provided above the mirrors to assist in installation, while two 1/4"-20 (M6) through tapped holes provide access to each flexure clamp. The SM05 port and 1/4"-20 (M6) through tapped holes, which are located on the top of the GCM102, are blocked using an SM05PL plug or a 1/4"-20 (M6) setscrew, respectively, so that the system can remain light tight. For step-by-step instructions on how to install the galvo mirror, please see section 3.1 of the manual.
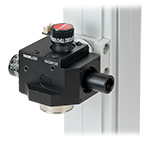
Click to Enlarge
GCM102 with Attached LSM02 Mounted on a 66 mm Rail

Click to Enlarge
GCM102 with Attached CLS-SL Mounted on a Ø1.5" Post
| Scan Lens Compatibilitya | |||
|---|---|---|---|
| Item # | Scanning Distanceb | Lens Mounting Thread | Required Adapterb |
| LSM02(-BB) | 16.1 mm ± 5 mm | External M25 x 0.75 | GCMA1 |
| LSM54-850 |
17.8 mm ± 7.5 mm | SM2A33 | |
| LSM54-1050 |
|||
| LSM54-1310 | |||
| LSM03(-BB) | 18.9 mm ± 5 mm | GCMA1c | |
| LSM04(-BB) | |||
| LSM03-VIS | 29.0 mm ± 5 mm | SM2A33 and SM2L03 | |
| SL50-CLS2 | 37.8 ± 4 mm | External SM30 (M30.5 x 0.5) |
SM2A11 and SM2V05 |
| SL50-2P2 | |||
| LSM05(-BB) | 75.5 mm ± 5 mm | External SM2 (2.035"-40) | SM2L20 |
| CLS-SL | 58 ± 6 mm | SM2L05 and SM2V05 | |

- Three Ø3.4 mm Countersunk Through Holes for Attachment to a 1D or 2D Galvo System
- Three Ø5.0 mm Through Holes for Attachment to the PY003 (PY003/M) Tip and Tilt Platform
The GTT001 Tip and Tilt Platform Adapter allows the GVSX01 and GVSX02 Galvo Systems to be mounted on a PY003 Tip and Tilt Platform. Included with the GTT001 are three M3 cap screws, three 8-32 cap screws, and three M3 countersunk screws for mounting purposes.
 Products Home


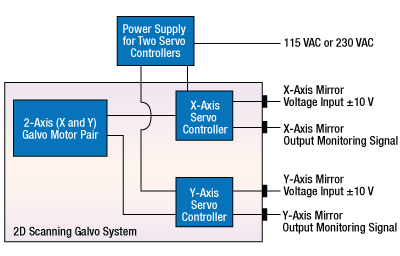
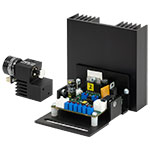
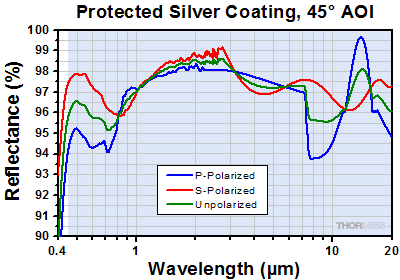
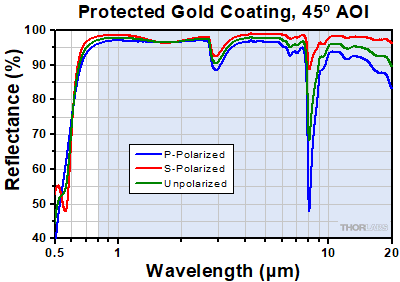
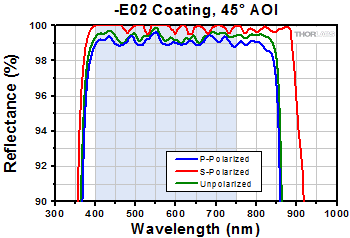

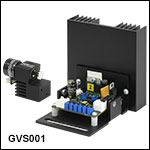
 Zoom
Zoom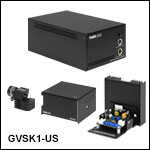
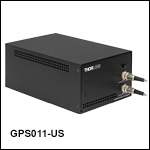
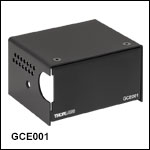
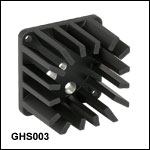
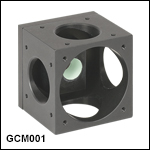


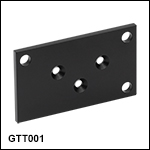
 1- & 2-Axis Galvos:±25° Scan Angle